I have an task to run a Stored procedure after every 30 minutes.
My first choice is to create a job on Sql server. But I also have to write a log file along with the stored procedure.
Now, my choice will be Windows service. Creating a windows service is a very easy task but how to deply......
let me explain how to work with windows service.
Creating a program that can run in the background of the operating system has any benefits, this is very important as the program can run without a graphic user interface. Complex service that are to run are longer time, and without the need the user to login the system. Windows services are harder to develop, debug, and test. But if you software are to run in server that require to start up automatically with the server is turn on, Windows service is your choice.
Creating your skeleton project in Visual Studio 2008
To create a Windows Service project in Visual Studio 2008, you must select from the Visual C# Windows Projects. Give your Windows Service a name, and then select OK
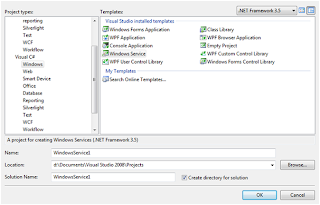
As a result Visual Studio 2008 creates you an empty solution with a Windows Service project as a default to the development.
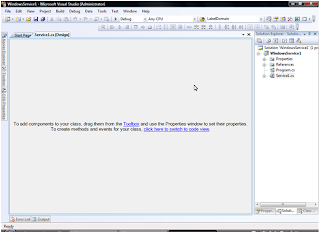
Switch to code view, to start developing.

As you can see that Visual Studio 2008 has simplify the layout and initialization of the code for Windows Service development. Now let’s start by creating the PingJob() method;
public partial class Service1 : ServiceBase
{
public Service1()
{
InitializeComponent();
}
protected override void OnStart(string[] args)
{
System.Threading.ThreadStart job = new System.Threading.ThreadStart(PingJob);
System.Threading.Thread thread = new System.Threading.Thread(job);
thread.Start();
}
protected override void OnStop()
{
Environment.Exit(-1);
}
static void PingJob()
{
while (true)
{
try
{
string fname = "c:\\a.txt";
FileInfo file1 = new FileInfo(fname);
StreamWriter sw = File.AppendText("c:\\a.txt");
sw.WriteLine("This is a demo for appending text content to a file");
// Writing a string directly to the file
sw.WriteLine(DateTime.Now); // Writing content read from the textbox in the form
sw.Close();
//System.Net.IPHostEntry objIPHE = System.Net.Dns.GetHostEntry("www.google.com");
System.Threading.Thread.Sleep(2000); // wait 15 seconds
}
catch (Exception ex)
{
EventLog.WriteEntry("PingTest Service", ex.Message, EventLogEntryType.Warning);
}
}
}
}
Do a Build Solution (Ctrl+Shift+B) to make sure that all your codes don’t have any bugs.
Creating an Installer for you Windows Service
From you solution select File>Add>New Project… from menu
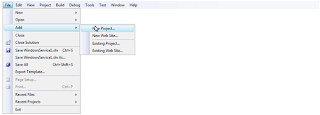
Then from Add New Project, select Other Project Types, and choose Setup Project
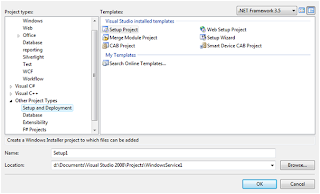
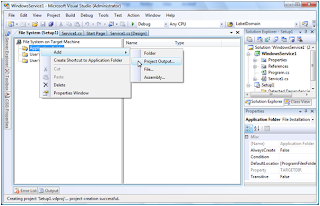
Then Visual Studio 2008 will prepare a setup shell for you configure the set require of Solution, and now let add our Windows Service to our installer. From the Application Folder right-click, select Add>Project Output.
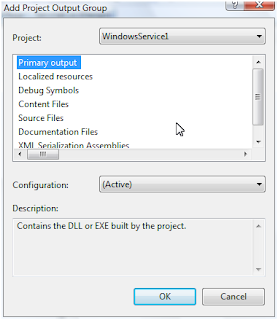
From the Add Project Output Group windows select the Primary output and make sure that your Windows Service Project is select has the project, then select OK.
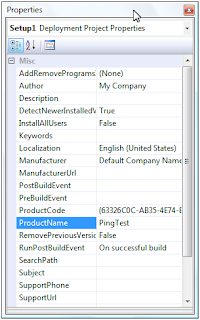
From the Setup properties configure your properties of your installer;
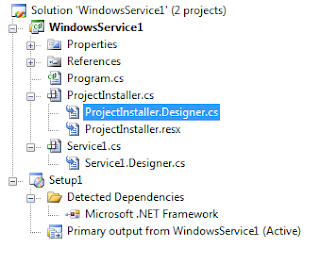
Switch to code mode to start configure the behavior of your windows service application, doing this by selecting ProjectInstaller.Designer.cs.
Modify the service installer as you require, as for me I usually modify account the service will run as, the service startup type, and the service name that will appear in Windows Service MMC.
private
void InitializeComponent()
{
this.serviceProcessInstaller1 = new System.ServiceProcess.ServiceProcessInstaller();
this.serviceInstaller1 = new System.ServiceProcess.ServiceInstaller();
//
// serviceProcessInstaller1
//
this.serviceProcessInstaller1.Account = System.ServiceProcess.ServiceAccount.LocalSystem;
//this.serviceProcessInstaller1.Password = null;
//this.serviceProcessInstaller1.Username = null;
this.serviceProcessInstaller1.AfterInstall += new System.Configuration.Install.InstallEventHandler(this.serviceProcessInstaller1_AfterInstall);
//
// serviceInstaller1
//
this.serviceInstaller1.ServiceName = “PingTestService”;
this.serviceInstaller1.StartType = System.ServiceProcess.ServiceStartMode.Automatic;
// ProjectInstaller
//
this.Installers.AddRange(new System.Configuration.Install.Installer[] {
this.serviceProcessInstaller1,
this.serviceInstaller1});
}
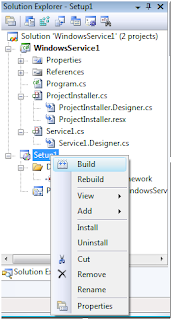
Do a Build Solution to test that does your solution contains any bugs, let’s hope the best. Then Build the Installer from the Setup project by right-click on the Setup project, and choose build the project. Therefore you can see that there is Install/Uninstall option if you complete building the installer, and that you right-click again.
Now go to command prompt:-
C:\Windows\Microsoft.NET\Framework\v2.0.50727>installutil C:\WinService\WindowsService1\bin\Debug\WindowsService1.exe
Download Code from this location
My first choice is to create a job on Sql server. But I also have to write a log file along with the stored procedure.
Now, my choice will be Windows service. Creating a windows service is a very easy task but how to deply......
let me explain how to work with windows service.
Creating a program that can run in the background of the operating system has any benefits, this is very important as the program can run without a graphic user interface. Complex service that are to run are longer time, and without the need the user to login the system. Windows services are harder to develop, debug, and test. But if you software are to run in server that require to start up automatically with the server is turn on, Windows service is your choice.
Creating your skeleton project in Visual Studio 2008
To create a Windows Service project in Visual Studio 2008, you must select from the Visual C# Windows Projects. Give your Windows Service a name, and then select OK

As a result Visual Studio 2008 creates you an empty solution with a Windows Service project as a default to the development.

Switch to code view, to start developing.

As you can see that Visual Studio 2008 has simplify the layout and initialization of the code for Windows Service development. Now let’s start by creating the PingJob() method;
public partial class Service1 : ServiceBase
{
public Service1()
{
InitializeComponent();
}
protected override void OnStart(string[] args)
{
System.Threading.ThreadStart job = new System.Threading.ThreadStart(PingJob);
System.Threading.Thread thread = new System.Threading.Thread(job);
thread.Start();
}
protected override void OnStop()
{
Environment.Exit(-1);
}
static void PingJob()
{
while (true)
{
try
{
string fname = "c:\\a.txt";
FileInfo file1 = new FileInfo(fname);
StreamWriter sw = File.AppendText("c:\\a.txt");
sw.WriteLine("This is a demo for appending text content to a file");
// Writing a string directly to the file
sw.WriteLine(DateTime.Now); // Writing content read from the textbox in the form
sw.Close();
//System.Net.IPHostEntry objIPHE = System.Net.Dns.GetHostEntry("www.google.com");
System.Threading.Thread.Sleep(2000); // wait 15 seconds
}
catch (Exception ex)
{
EventLog.WriteEntry("PingTest Service", ex.Message, EventLogEntryType.Warning);
}
}
}
}
Do a Build Solution (Ctrl+Shift+B) to make sure that all your codes don’t have any bugs.
Creating an Installer for you Windows Service
From you solution select File>Add>New Project… from menu

Then from Add New Project, select Other Project Types, and choose Setup Project

Then Visual Studio 2008 will prepare a setup shell for you configure the set require of Solution, and now let add our Windows Service to our installer. From the Application Folder right-click, select Add>Project Output.

From the Add Project Output Group windows select the Primary output and make sure that your Windows Service Project is select has the project, then select OK.

From the Setup properties configure your properties of your installer;

Switch to code mode to start configure the behavior of your windows service application, doing this by selecting ProjectInstaller.Designer.cs.

Modify the service installer as you require, as for me I usually modify account the service will run as, the service startup type, and the service name that will appear in Windows Service MMC.
private
void InitializeComponent()
{
this.serviceProcessInstaller1 = new System.ServiceProcess.ServiceProcessInstaller();
this.serviceInstaller1 = new System.ServiceProcess.ServiceInstaller();
//
// serviceProcessInstaller1
//
this.serviceProcessInstaller1.Account = System.ServiceProcess.ServiceAccount.LocalSystem;
//this.serviceProcessInstaller1.Password = null;
//this.serviceProcessInstaller1.Username = null;
this.serviceProcessInstaller1.AfterInstall += new System.Configuration.Install.InstallEventHandler(this.serviceProcessInstaller1_AfterInstall);
//
// serviceInstaller1
//
this.serviceInstaller1.ServiceName = “PingTestService”;
this.serviceInstaller1.StartType = System.ServiceProcess.ServiceStartMode.Automatic;
// ProjectInstaller
//
this.Installers.AddRange(new System.Configuration.Install.Installer[] {
this.serviceProcessInstaller1,
this.serviceInstaller1});
}

Do a Build Solution to test that does your solution contains any bugs, let’s hope the best. Then Build the Installer from the Setup project by right-click on the Setup project, and choose build the project. Therefore you can see that there is Install/Uninstall option if you complete building the installer, and that you right-click again.
Now go to command prompt:-
C:\Windows\Microsoft.NET\Framework\v2.0.50727>installutil C:\WinService\WindowsService1\bin\Debug\WindowsService1.exe
Download Code from this location


